Hello,
Long time lurker, first time poster. Not sure if this has been posted about yet, but I wanted to get it out there.
I had been searching tirelessly trying to figure out how to install Microsoft Office 2016 ProPlus via post-setup on a Windows 10 Pro image and I finally figured it out.
What you will need:
- Windows 10 ISO (obviously)
- Office 2016 ProPlus ISO
- Office 2016 ProPlus MSP File already configured (Instructions on Customizing Office for Silent Install)
1) Extract the contents of the Office 2016 ProPlus ISO to a folder. (I just used 7-zip to extract the contents of the Office 2016 ProPlus ISO). Then follow the instructions in the link above to customize the Office Install via an MSP File. Using an MSP file you can have Office install silently, add the product key for activation, etc.
2) Load and customize your image with all of your settings as far as Components, Features, Settings, Updates, Drivers, etc. Make sure to also enable Unattended and check the boxes in at the top for OEM SetupComplete and Copy to install image. I recommend adding some installer files to Post Setup so that step 2 is accomplished. (You can create an ISO at the end, but it's not necessary at this point).
3) After the image has been saved, NTLite creates a folder in the sources directory of the image directory called "$OEM$". This directory will create two additional directories inside the "$$\Setup" directory called "Files" and "Setup". The Files directory will contain the installers you added previously and the Setup directory will contain the SetupComplete command file.
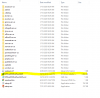
4) Copy the contents of the Office 2016 Pro Plus ISO to the Windows 10 image directory to the path "Image Directory\sources\$OEM$\$$\Setup\Files" so the image directory will end up having "Image Directory\sources\$OEM$\$$\Setup\Files\Office 2016 ProPlus". Copy the entire folder into the directory mentioned above.
5) Reload the same image from your source history. Once loaded make any additional changes that you wish to make to the image.
6) In Post Setup, at the end of any installer files you added to your image previously, add two commands. In the first command, enter "cd" in the Execution queue column and then enter "%WINDIR%\Setup\Files\Directory of Office Pro Plus" in the Parameters column. In the second command, enter "setup.exe" in the Execution queue column enter "/adminfile PathToMSPFileInOfficeDirectory.msp" (my MSP file is in the root of my Office Pro Plus directory).
7) Apply your changes to your image and you can now create an ISO of that image to install on a machine.
8) If done correctly, your image should silently install Office granted that you have setup a silent install in your MSP file.
I have attached some screenshots to better clarify some of the things I mentioned above.
This worked for me after a lot of tinkering with Post Setup and hopefully it can help some of you too.
Long time lurker, first time poster. Not sure if this has been posted about yet, but I wanted to get it out there.
I had been searching tirelessly trying to figure out how to install Microsoft Office 2016 ProPlus via post-setup on a Windows 10 Pro image and I finally figured it out.
What you will need:
- Windows 10 ISO (obviously)
- Office 2016 ProPlus ISO
- Office 2016 ProPlus MSP File already configured (Instructions on Customizing Office for Silent Install)
1) Extract the contents of the Office 2016 ProPlus ISO to a folder. (I just used 7-zip to extract the contents of the Office 2016 ProPlus ISO). Then follow the instructions in the link above to customize the Office Install via an MSP File. Using an MSP file you can have Office install silently, add the product key for activation, etc.
2) Load and customize your image with all of your settings as far as Components, Features, Settings, Updates, Drivers, etc. Make sure to also enable Unattended and check the boxes in at the top for OEM SetupComplete and Copy to install image. I recommend adding some installer files to Post Setup so that step 2 is accomplished. (You can create an ISO at the end, but it's not necessary at this point).
3) After the image has been saved, NTLite creates a folder in the sources directory of the image directory called "$OEM$". This directory will create two additional directories inside the "$$\Setup" directory called "Files" and "Setup". The Files directory will contain the installers you added previously and the Setup directory will contain the SetupComplete command file.
4) Copy the contents of the Office 2016 Pro Plus ISO to the Windows 10 image directory to the path "Image Directory\sources\$OEM$\$$\Setup\Files" so the image directory will end up having "Image Directory\sources\$OEM$\$$\Setup\Files\Office 2016 ProPlus". Copy the entire folder into the directory mentioned above.
5) Reload the same image from your source history. Once loaded make any additional changes that you wish to make to the image.
6) In Post Setup, at the end of any installer files you added to your image previously, add two commands. In the first command, enter "cd" in the Execution queue column and then enter "%WINDIR%\Setup\Files\Directory of Office Pro Plus" in the Parameters column. In the second command, enter "setup.exe" in the Execution queue column enter "/adminfile PathToMSPFileInOfficeDirectory.msp" (my MSP file is in the root of my Office Pro Plus directory).
7) Apply your changes to your image and you can now create an ISO of that image to install on a machine.
8) If done correctly, your image should silently install Office granted that you have setup a silent install in your MSP file.
I have attached some screenshots to better clarify some of the things I mentioned above.
This worked for me after a lot of tinkering with Post Setup and hopefully it can help some of you too.