You are using an out of date browser. It may not display this or other websites correctly.
You should upgrade or use an alternative browser.
You should upgrade or use an alternative browser.
Change lock screen background and desktop wallpaper with NTLite
- Thread starter alucke
- Start date
Saaglem
Active Member
Yup. When loading the OS into NTLite it creates a TEMP OS on the C:\Temp\NLTmpMount01. Inside this is the OS that NTLite will be tuning. Close NTLite but DON'T unload the OS.
Before you go all Rambo on this, it has stages. First create the pics below. Don't create the files that doesn't exist, you do not have to create them. You need to look inside the folder to know.
Create your image in paint as 448 x 448 save it as a BMP file and again as a PNG file, name the files user.bmp and user.png.
These you don not have to create a BMP of,
Resize the image to 200×200 and save as User-200.png
Resize the image to 40×40 and save as user-40.png
Resize the image to 32×32 and save as user-32.png
Resize the image to 48×48 and save as user-48.png
Resize the image to 192×192 and save as user-192.png
If you want to manage the guest account pictures replace guest.png and guest.bmp with the 448 x 448 copies of your image and name it accordingly.
The various sizes makes the images visible in various places such as the top right corner (smaller image), the login screen etc.
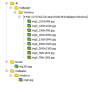
You need to take ownership of the folders before you edit or change to contents. I included the ownership reg file, it add's it to the right click context menu. Un-rar and double click it and agree to all.
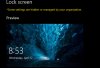
Copy your lock screen personal images, the small ones, to C:\ProgramData\Microsoft\User Account Pictures\
NOTE: Replace all the user images with the exact same formats and sizes. Keep the name structures and replace the ones inside the folder. Delete any .dat files in the folder.
The lock screen background. This I have not tested since I remove mine, but they are located at,
c:\Windows\Web\Screen\
Replace them with yours but make sure the file names remains the same along with what I assume the pixel size (I think).
The background is a little trickier. They are stored in 3 places, most of the time only 2 but I replace all three if the third exist.
c:\windows\Web\Wallpaper\Windows\ is the one, img0.jpg. Keep the name structure, the size is not important. You can also add additional images in the following folder should you want to use the sliding screensaver.
c:\windows\Web\Wallpaper\
Then the next one is in the following folder. Again, keep the name structure and the size is not important.
c:\Windows\WinSXS\amd64_microsoft-windows-s..l-wallpaper-windows_31bf3856ad364e35_10.0.17763.1_none_cbd8101a089b2adb
The third place I have found on one machine and it's at. Again, keep the name structure and the size is not important.
c:\Windows\WinSXS\amd64_microsoft-windows-s..l-wallpaper-windows_31bf3856ad364e35_10.0.15063.0_none_ec25ff6de9407847
IMPORTANT: Empty the recycle bin, agree to all to delete before you restart.
Then just restart since the files you removed will be cached and NTLite complain and WILL NOT finish the rip. Some say just refresh explorer but it is not always released. After restart go back into NTLite and apply your settings and finish the rip.
Done
Before you go all Rambo on this, it has stages. First create the pics below. Don't create the files that doesn't exist, you do not have to create them. You need to look inside the folder to know.
Create your image in paint as 448 x 448 save it as a BMP file and again as a PNG file, name the files user.bmp and user.png.
These you don not have to create a BMP of,
Resize the image to 200×200 and save as User-200.png
Resize the image to 40×40 and save as user-40.png
Resize the image to 32×32 and save as user-32.png
Resize the image to 48×48 and save as user-48.png
Resize the image to 192×192 and save as user-192.png
If you want to manage the guest account pictures replace guest.png and guest.bmp with the 448 x 448 copies of your image and name it accordingly.
The various sizes makes the images visible in various places such as the top right corner (smaller image), the login screen etc.
You need to take ownership of the folders before you edit or change to contents. I included the ownership reg file, it add's it to the right click context menu. Un-rar and double click it and agree to all.
Copy your lock screen personal images, the small ones, to C:\ProgramData\Microsoft\User Account Pictures\
NOTE: Replace all the user images with the exact same formats and sizes. Keep the name structures and replace the ones inside the folder. Delete any .dat files in the folder.
The lock screen background. This I have not tested since I remove mine, but they are located at,
c:\Windows\Web\Screen\
Replace them with yours but make sure the file names remains the same along with what I assume the pixel size (I think).
The background is a little trickier. They are stored in 3 places, most of the time only 2 but I replace all three if the third exist.
c:\windows\Web\Wallpaper\Windows\ is the one, img0.jpg. Keep the name structure, the size is not important. You can also add additional images in the following folder should you want to use the sliding screensaver.
c:\windows\Web\Wallpaper\
Then the next one is in the following folder. Again, keep the name structure and the size is not important.
c:\Windows\WinSXS\amd64_microsoft-windows-s..l-wallpaper-windows_31bf3856ad364e35_10.0.17763.1_none_cbd8101a089b2adb
The third place I have found on one machine and it's at. Again, keep the name structure and the size is not important.
c:\Windows\WinSXS\amd64_microsoft-windows-s..l-wallpaper-windows_31bf3856ad364e35_10.0.15063.0_none_ec25ff6de9407847
IMPORTANT: Empty the recycle bin, agree to all to delete before you restart.
Then just restart since the files you removed will be cached and NTLite complain and WILL NOT finish the rip. Some say just refresh explorer but it is not always released. After restart go back into NTLite and apply your settings and finish the rip.
Done
Attachments
Last edited:
crypticus
Well-Known Member
Close NTLite but DON'T unload the OS.
NOPE. dont close ntlite. just click to explore extracted files. and change them.
Qu1goN
New Member
Saaglem First, sorry for my bad english. ")
I try this and the lock screen background works. But the lock screen personal image is still the original windows one.
I read on another page that you have to set a registry entry. Like this:
Is that true or does it work without it?
I try this and the lock screen background works. But the lock screen personal image is still the original windows one.
I read on another page that you have to set a registry entry. Like this:
Code:
Windows Registry Editor Version 5.00

[HKEY_LOCAL_MACHINE\SOFTWARE\Microsoft\Windows\CurrentVersion\Policies\Explorer]
"UseDefaultTile"=dword:00000001Saaglem
Active Member
I have no idea....LoL
What I normally do is I copy my images after I ripped windows in NTlite....meaning.... When I start removing what I don't want in NTLite and rip it. Then I load the ripped image again in NTLite and then I copy my images to the selected folders and then create the iso. I will attach some of my profile images here. Just copy the images to the C:\ProgramData\Microsoft\User Account Pictures.
It needs to be exactly the same size.
Here is a howto.....
This also work in Windows 8.1, Just create the folder if it does not exist and do the same as with in Windows 10.
Some guides I read online talk about a folder at C:\ProgramData\Microsoft\User Account Pictures. This directory didn’t exist on my version of Windows 8.1 enterprise so use the folder in step 4 below instead.
Create your image in paint.net as 448 x 448 save it as a BMP file and again as a PNG file, name the files user.bmp and user.png.
Resize the image to 200×200 and save as User-200.png
Resize the image to 40×40 and save as user-40.png
Copy these files to C:\ProgramData\Microsoft\User Account Pictures
If you want to manage the guest account pictures replace guest.png and guest.bmp with the 448 x 448 copies of your image named
appropriately.
Delete any .dat files in the folder and restart.
The default is now the image you placed in that folder. The various sizes make this image visible in various places such as the top right corner (smaller image), the login screen etc.
Regarding the reg key.....I can not remember when I started using it and why.....but I do know I still use it along with many other crap.
Attachments


Qu1goN
New Member
Thank you. For me (in Win 10) it only works with the RegFile - only replace the Images doesn't work. Here i read the Post from Connor1368:

 community.spiceworks.com
And one more thing... if i run the Regfile under a running windows it works, but i have the Prob with "Some settings are hidden or managed by your organization" see Screenshot. But if i integrate the regfile with NTLite before installing it will all be normal. So now is all good for me.
Maybe this will help somebody who have the same Problem with the Regfile.
Changing Windows 10 1607 Default Logon Screen User Icon
I know there is no specific policy, but I have an OU where it works and another that has far fewer policies that it doesn’t work. I never really bothered investigating (it works where I need!) but the few things I did investigate indicated control panel GP.
community.spiceworks.com
And one more thing... if i run the Regfile under a running windows it works, but i have the Prob with "Some settings are hidden or managed by your organization" see Screenshot. But if i integrate the regfile with NTLite before installing it will all be normal. So now is all good for me.
Maybe this will help somebody who have the same Problem with the Regfile.
Attachments
francis11
Active Member
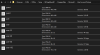
Hi, Yes i do this everytime i make a new NTlited image. It works even i know it's the "dirty" way. If you want to change the pics for Lockscreen and Wallpapers in your NTLited image just go to the mounted folder of your image in NTlite folder (\NTLite\Temp\NLTmpMount01) and open \Windows\Web, there will be 3 folders (look at attached file for the folder structure and resolution for 4K to change pics) - if you want to change 4K wallpaper pics (if you use a 4K screen?) you have to change all the pics with different resolution and i agree with Saaglem that Paint.NET is the right tool to do this in a quick and time saving way - also for User Account Pics.is it possible to use custom lockscreen background and custom desktop wallpaper with NTlite?
alucke
To change the pics in the mounted image you have to take ownership of the files in each folder to overwrite them before you can replace them. I use TakeOwnershipPro freeware to do this (that's the dirty trick). Just copy/ paste you preferred pics over in each folder named the same way you see in attached file and they will stay in your applied image - delete the rest if you don't need them before Apply, like for default Windows themes.
I also change User Account Pictures but don't delete the .dat files and just replace the pics with the Paint.NET custom resolutions (see second attached for names, resolution, fileformat) and say yes to overwriting. It works without adding a regkey.
Attachments
Saaglem
Active Member
There is actually another place you have to replace the wallpaper image because Windows will try to revert the image from it's storage location and overwrite the img0.jpg file. Look in the following places for them and once you found the right location take ownership of them and overwrite it with your files. Replace the files with the file names in that folder....the size of the files does not matter but the names does!
NOTE, these are for more than one version of Windows 10 LTSC, not all of them though!
C:\Windows\WinSXS\
amd64_microsoft-windows-s..l-wallpaper-windows_31bf3856ad364e35_10.0.10586.0_none_6797be8d5ac8f210
amd64_microsoft-windows-s..l-wallpaper-windows_31bf3856ad364e35_10.0.14393.0_none_088691afc7246346
amd64_microsoft-windows-s..l-wallpaper-windows_31bf3856ad364e35_10.0.15063.0_none_ec25ff6de9407847
amd64_microsoft-windows-s..l-wallpaper-windows_31bf3856ad364e35_10.0.16299.15_none_fdfe522721963209
amd64_microsoft-windows-s..l-wallpaper-windows_31bf3856ad364e35_10.0.17763.1_none_cbd8101a089b2adb
.......or you can just search for img0.jpg in the WINSXS folder.
Attachments
Easy to remove the component Wallpaper from the image and add the new ones to the $oem$ folder, already posted in the forums
SHARE A LINK PLEASE
George King
Active Member
SHARE A LINK PLEASE
Removing components is very easy, simply search for it

And If you want to add your own Wallpapers, you can place it directly in mounted image
Code:
%IMAGE%\Windows\Web\Wallpaper
Code:
%ISO%\sources\$OEM$\$$\Web\Wallpaper%IMAGE%\Windows\Web\WallpaperRemoving components is very easy, simply search for it
View attachment 4952
And If you want to add your own Wallpapers, you can place it directly in mounted image
Or you you can use $OEM$ folder on ISOCode:%IMAGE%\Windows\Web\Wallpaper
Code:%ISO%\sources\$OEM$\$$\Web\Wallpaper
where their location in iso file or load file I am beginner's so help me
George King
Active Member
%IMAGE%\Windows\Web\Wallpaper
where their location in iso file or load file I am beginner's so help me
I mean mounted install.wim path as %IMAGE%

%ISO% mean ISO root, I gived you exactly folders when you can place your own wallpapers. On ISO these folders doesn't exist, simply create them

Thx bro it's workingI mean mounted install.wim path as %IMAGE%
View attachment 4953
%ISO% mean ISO root, I gived you exactly folders when you can place your own wallpapers. On ISO these folders doesn't exist, simply create them
View attachment 4954

One more question. Can we change version name of window ?? Windows basic information like it's build name, and about
crypticus
Well-Known Member
You can always edit basebrd.dll.mui via resource hacker to change the windows year, name etc visible at windows... Windows\Branding\Basebrd\...Thx bro it's working
One more question. Can we change version name of window ?? Windows basic information like it's build name, and about
if you want to change the windows name, logo, user agrement and maybe iso edit date visible during boot you need to edit;
1) for name and describtion: describtion and name edit via right clicking at install.wim during ntlite screen
2) for user agrement: license.rtf in install.wim (Windows\System32\ and Windows\System32\en_gb etc u need to change every one of them. for win7 only you have to use newer boot like win10's. or else it won't change.)
3) for custom boot logo: use HackBGRT but won't work for uefi only legacy
4) for custom iso edit date: edit your use wimlib-imagex for exp
%~dp0wimlib-imagex info %~dp0install.wim 1 --image-property CREATIONTIME/HIGHPART=0x01DC79D7 --image-property CREATIONTIME/LOWPART=0xA48E7000
get low and high from here http://lab.windowswiki.info/whtc/
also u can change boot graphics etc but i won't type it its long.
dont bother if you don't want to research and learn these tho.. they won't be easy at first. i automated via batch script so its one click for me. u can do the same too.