Except NTLite has no current support to accept a folder of package files and Licenses, and match them.
I have an unreleased script to insert custom actions into <Commands><PostUpdates>. Right now, it does your WA files.
Guess my "to do" list keeps growing...
The second batch of instructions is reserved for users with OEM license keys (in factory BIOS).
Otherwise run the first set of instructions.
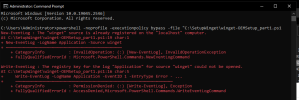
The corrected command in your preset would be:
<Path>start</Path>
<Params>cmd /c powershell -NoProfile -ExecutionPolicy Bypass -file "C:\SetupWinget\winget-OEMSetup_part1.ps1"</Params>
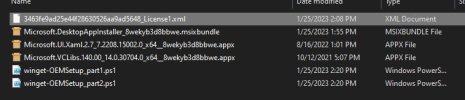
2. Copy files to new ISO folder \sources\$OEM$\$1\SetupWinget
Code:
2/07/2023  11:07 AM             2,688 3463fe9ad25e44f28630526aa9ad5648_License1.xml
2/07/2023  11:07 AM        15,454,493 Microsoft.DesktopAppInstaller_8wekyb3d8bbwe.msixbundle
2/07/2023  11:07 AM         5,070,720 Microsoft.UI.Xaml.2.7_7.2208.15002.0_x64__8wekyb3d8bbwe.appx
2/07/2023  11:07 AM         6,638,831 Microsoft.VCLibs.140.00.UWPDesktop_14.0.30704.0_x64__8wekyb3d8bbwe.appx
2/07/2023  11:07 AM             1,126 winget-OEMSetup_part1.ps1
2/07/2023  11:07 AM             1,404 winget-OEMSetup_part2.ps1
3. Post-Setup tasks
winget 1.4 still hasn't fixed their Chrome issue... Roll back to winget 1.3.2691
I have done everything in the posts. copied the files to \sources\$OEM$\$1\SetupWinget and have it set up in post. but keeps giving me the same error message.
I think I see what I did. I used "Microsoft.VCLibs.140.00_14.0.30704.0_x64__8wekyb3d8bbwe.appx" instead of "Microsoft.VCLibs.140.00.UWPDesktop_14.0.30704.0_x64__8wekyb3d8bbwe.appx"
Yes and no. For someone who's familiar with PS, it makes total sense.
But my intent was to make the temp folder as obvious for non-programmers. And technically the PS scripts don't need to live in the same folder as the packages. A casual user can get quickly confused if they don't see the actual path to guide them.
I'm trying to do this exact thing. Tried a different method to accomplish getting a Windwos 10 ISO that automatically installs the latest version of programs like Chrome etc from Winget with no success. So has anyone found out how to get this to fully work? If so is there some definitive instructions?
Unless you've found a better solution, this is it. If that's too frustrating, switch to Chocolatey.
MS made the bad decision to package winget as UWP, instead of Win32.
I finished rewriting my script; it took over a week of testing to discover many normal steps didn't work in unattended Setup...
We'll install winget 1.3 development branch from GitHub (not Store), which introduces the new feature of downloading Store apps without using any Microsoft Account. Don't know if 22H2's next version will catch up to the dev branch.
We don't care about the actual DesktopAppInstaller package file, delete it now.
Look for the saved package files Microsoft.UI.Xaml.2.7 & Microsoft.VCLibs.140.00.UWPDesktop.
Unwinding the different layers took a while. Post-Setup runs as SYSTEM, which is allowed to add provisioned packages but cannot trigger Add-AppxPackage -- since it's a Service Account. winget.exe exists at that point, but cannot run until the first user gets provisioned.
A solution proposed by David Just to force this action by scheduling an user task looks intriguing, but absolutely doesn't work for us.
While we could change the security profile, it still doesn't work because we need the user's password. There's no way to handle this if you left the unattended file blank, and created a new user in OOBE Setup.
The answer would be split work across two tasks: SYSTEM runs Add-AppxProvisionedPackage, user runs Add-AppxPackage and winget is ready.
But now the problem is winget doesn't run elevated, and can't install anything.
What's the fix? Write a script which runs twice, once as SYSTEM and self-scheduling as local user. This solves the elevation problem and makes setup very simple with one file to manage.
Now the script's got a final problem, typing in PowerShell's window can interrupt it. Just don't touch it!
I have tested starting the script manually and it works too.
In my case I would like to use this script manually, that is, run it myself after installing windows, I do not intend to use it through the post-setup, as I always prefer to install windows with the connection turned off.
But I don't understand anything about PowerShell, just the basics of batch. But from what I understand this script creates a scheduled task to run after logon and also deletes the folders after finishing the installations.
As I will always use it manually, if possible, could you please tell me what i need to change/remove in order for this script to work correctly and not delete the folder after it's done?
I found this script very useful as without it I would need to go into the store first and update the App installer as for some reason it doesn't come natively with the winget.
If you just want to install winget manually, you don't need any scripts. The script tries to solve the UAC problem, because Post-Setup (User) commands don't run with Admin privileges. When you install it by hand, you're agreeing to the UAC prompt.
Assuming you haven't removed the AppX Installer package, just open Explorer and click on the winget package file. Windows will automatically install everything for you. It's that simple.
winget's GitHub release runs ahead of the Store's version, but it allows you to install Store packages without needing a MS Account. Which is probably why they keep the two versions separate.
I've managed to get this working on our MDT server using the code that Chris Titus uses to install winget with his Windows Utility. Not sure if it will work with NTLite post setup, not given it a try, but I managed to get it working during the Install Application task sequence on MDT (which happens after automatic login).
By using gameros presets it removed something that is required for Winget and installation of winget can anyone help with the ntlite files i should be looking for.
This site uses cookies to help personalise content, tailor your experience and to keep you logged in if you register.
By continuing to use this site, you are consenting to our use of cookies.