Windows 11 unattend response file sharing

43.onsomeday

New Member
Messages
19
Reaction score
0
1. Bypass TPM and SecureBoot in NTLite Settings

2. EULA settings (local account registration)

3. All Windows versions can be selected (Pro can be installed even on home version laptops)It is not an NTLite configuration file, but purely a Windows11 autountend.xml file

How to apply

Preferences ▶ Unattended ▶ Select default in unattended mode from top menu bar ▶ Paste ISO file mount location

Example) D:\Program Files\NTLite\Cache\Images\org_Win11_23H2_Korean_x64v2\
------------NTLite installation location------------- -------Windows ISO folder------


NTLite installation location: If I install it on the C drive, it is written as C.
Windows ISO Folder: The ISO file name I entered becomes the folder name.
 

Attachments

Christoph Schneegans' Generate autounattend.xml files for Windows 10/11 was used to help create this answer file.

I know because he provides a fake "00000-00000-00000-00000-00000" Product Key. Setup will accept a blank key, but Christoph doesn't believe that's proper (he's wrong). This generated version is outdated because it has some fake HW bypass keys, which he did remove after my suggestion.

1. For licensed NTLite users, you can use the BypassTPM settings.

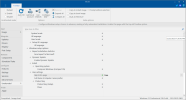
2. EULA is normally skipped from NTLite's Unattended screen.

1723134524044.png

3. Normal practice is to copy the ei.cfg to the ISO's \sources folder, instead of dynamically creating one. ei.cfg allows Setup to ignore the OEM product key if present in your PC's BIOS (Dell, HP, Lenovo, ASUS).

For a multi-edition ISO, NTLite users should check the "Prompt edition selection" box in the Unattended toolbar.

Whenever possible you should allow NTLite to create the autounattend.xml, and customize it after it's done. Of course, you can provide your own answer file, but most users don't understand how to write one.
 
제목 없음.png

I applied the TPM and SecureBoot bypass according to the NTLite Settings method you provided yesterday, but I encounter a black screen that prompts me to log in with a different user account that I did not create. However, when I apply the autounattend.xml file I uploaded, I can successfully create a local account at the EULA page.

I believe this information would be very helpful to beginners like myself, so I wanted to share it.

PS: It would be great if there were guidelines on conflicts that might occur among NTLite settings when applying TPM and SecureBoot bypass.
 
제목 없음03.jpg

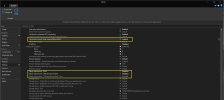
Local user account setup support ( BypassNRO ) > Enabled
Setup requirement - RAM, TPM and Secure Boot, TPM and Secure Boot - Hoset > Disabled


제목 없음04.jpg

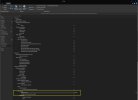
Unattended > Unattended mode - Enable > WindowsPE (Setup options) > Windows setup options > User settings > Skip EULA page - true


Can this method successfully bypass TPM and Secure Boot requirements and create a local account through the EULA page?
 
BypassTPM and for other HW requirements is handled through NTLite's Settings page for licensed users.

But it can done for free using Rufus' own option to create an unattended file (which runs "reg add" commands), or Christoph's autounttend.xml tool. If you prefer to use another source to create the unattend file, NTLite doesn't really care. Any autounattend.xml file that exists in the top of the ISO folder will be captured when the Create ISO action is taken.
 
1. Bypass TPM and SecureBoot in NTLite Settings

2. EULA settings (local account registration)

3. All Windows versions can be selected (Pro can be installed even on home version laptops)It is not an NTLite configuration file, but purely a Windows11 autountend.xml file

How to apply

Preferences ▶ Unattended ▶ Select default in unattended mode from top menu bar ▶ Paste ISO file mount location

Example) D:\Program Files\NTLite\Cache\Images\org_Win11_23H2_Korean_x64v2\
------------NTLite installation location------------- -------Windows ISO folder------


NTLite installation location: If I install it on the C drive, it is written as C.
Windows ISO Folder: The ISO file name I entered becomes the folder name.
I did downloaded your autountend.xml and fixed the missing part and now it view correct as xml file again
 

Attachments

Back
Top