Need help creating custom multiple edition ISO

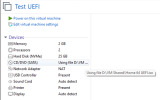
Sorry for mixing terms around. I created an ISO via NTLite and mounted it as a CD in the VM. Then I power on the VM to firmware. ALl the options you see are standard items that appear on Vware UEFI, and are not related to the the ISO/CD it is trying to boot from, they are just possible boot options. When i click/select the CDROM drive, as highlighted above it quickly cycles back to the same screen. I can keep hitting the enter key until the cows come home and it still does the same. If i just power on the VM it will give the error previoulsy as it cannot find a boot device. It's not a timeout as I am actively selecting the CDROM boot device and the VM is responding, equally I can cursor up and down in the list. I understand you think it's simply timing out but its not
why not just mount the ISO directly instead ?

i did that, didnt press a button. it gave a similar black screen, then went to the blue screen. what i think you have done is

and i have just done the same thing twice. as a test. with an official iso
 
why not just mount the ISO directly instead ?

i did that, didnt press a button. it gave a similar black screen, then went to the blue screen. what i think you have done is
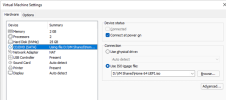
I have mounted the ISO directly into the VM and I AM pressing a button

2.png
 

Attachments

  • 1.png
    1.png
    57.7 KB
There aren't any other setting to check on the VM. It boots if the UEFI ISO is 32bit but not when 64bit

If you have built x64 Windiows editions with UEFI what steps did yuo take to do that?
 
There aren't any other setting to check on the VM. It boots if the UEFI ISO is 32bit but not when 64bit

If you have built x64 Windiows editions with UEFI what steps did yuo take to do that?

my uefi is bios set, so i didnt have to
 
You missed my point. In NTLite what steps did you go through to create your ISO?
well for starters, i didnt create partitions............ no point in my personal use. i dont mix x86 and x64 either. 1 image 1 disk
 
You might not create partitions but NTLite certainly does. It creates 4 for UEFI and that's all I have

PARTITIONEXTENDORDERSIZE (MB)TYPE
WinREFalse1450Primary
EFIFalse2100EFI
MSRFalse316MSR
WindowsTrue4'Leave empty'Primary
 
This is how i do mine.....

and notice ........ NO PARTITIONS like yours. and i have just created this.

this isnt a debate about whether NTlite creates 1, 2 or 420 partitions. all i did was ask why you had so many that modify each other
 

Attachments

  • autounattend.xml
    3.8 KB
The partitions are create by NTLite when you select the Disk Template in the Unattended section. I did'nt create them NTLite does and they don't overwrite each other

I will try without selecting it and see what happens

1.png
 
The partitions are create by NTLite when you select the Disk Template in the Unattended section. I did'nt create them NTLite does and they don't overwrite each other

I will try without selecting it and see what happens

View attachment 7041

i never use the disk template, maybe that will sort it out for you
 
If it does I've wasted days on this chasing my tail, thought it was required, but obvioulsy not. Thanks will let you know, I hope it does
 
If it does I've wasted days on this chasing my tail, thought it was required, but obvioulsy not. Thanks will let you know, I hope it does
any reports back helps the community. thats the important bit. good luck with it.
 
No change, still won't boot under UEFI

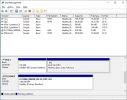
I mounted the drive onto another VM to look at the partitions that were created during install, and at lest 1 is missing

3.png

Below is from my real PC, although you only see 3 of the 4 UEFI partitions in Disk Management

2.png

Can't carry on with this. Have to move on to other options, and circle back some time and revisit it
 

Attachments

  • autounattend.xml
    9.1 KB
  • 1.png
    1.png
    108.8 KB
hey, I have seen this thread for a time but couldn't actually reply with a solution because I was busy. Probably I'm one of the few creates that x64 x86 combined ISOs around here with multiple edition from w7 to w11. My ISOs are generally higher than 30gb+ and works. I will explain you my way of doing it by steps. My method requires external scripts. %100 works for me with UEFI or MBR. Doesn't matter the environment.

1) MultiLanguage: (I use abbodi's multilanguage script to add english to turkish isos one by one, do this step for each iso you have i mean w7 w8.1 w10 w11)
2) NTLite: Do your edits to each ISO you have, place or remove files by exploring mounted content (answer file should be inside panter folder so click on copy to install.wim option)
3) MultiArchitecture: (I use abbodi's multiarchitecture script to combine x64 and x86 images. So in this step everthing is combined) Note: You have to use W10's or W11's ISO as a base and extract others to it. Or It won't work.
4) Boot.wim (If you used W11 as a base, then you will need to apply TPM ByPass) (Or add your drivers etc in this step)
5) ISO Folder Remove answer file if its in iso root. We already have one unique answer file for each edition inside their panther folder. Also make your other edits. Autorun files icons etc. Also you can open boot.wim or install.wim with 7Zip and remove/add files now too. Its handy to make changes that requires privilages because u can bypass that restriction with 7zip.
6) Convert to esd and create an ISO.

Required scripts;
Multilang Scripts: w11/10 - w8.1/8 - w7
MultiArchitecture Script: Here

Also I attached my example preset that I use for w11 and w10. I use similar for w8.1 and w7 (same unattend part) You can see that i don't change much in unattend part. I use abbodi's scripts because with his multilang script you can get a nice GUI selection at the start of setup to choose what language you want. When you add language files manually via ntlite by yourself you won't get that GUI. I use multiarchitecture script because when I did it manually by myself via ntlite in the past, i always had issues like yours. So i found his scripts that handles everything properly combines ISOs and editions. BTW I create multi lang and ntlite in order and before multilang because if you combine them first you will endup with a 30gb iso that you have to mount and unmount lots of time for each edit. So start doing edits on seperate isos then combine them. its faster and safer and easier to start again on just one small ISO than starting again on 30gb iso.
 

Attachments

  • Windows 10.xml
    17.5 KB
  • Windows 11.xml
    17.4 KB
Last edited:
hey, I have seen this thread for a time but couldn't actually reply with a solution because I was busy. Probably I'm one of the few creates that x64 x86 combined ISOs around here with multiple edition from w7 to w11. My ISOs are generally higher than 30gb+ and works. I will explain you my way of doing it by steps. My method requires external scripts. %100 works for me with UEFI or MBR. Doesn't matter the environment.

1) MultiLanguage: (I use abbodi's multilanguage script to add english to turkish isos one by one, do this step for each iso you have i mean w7 w8.1 w10 w11)
2) NTLite: Do your edits to each ISO you have, place or remove files by exploring mounted content (answer file should be inside panter folder so click on copy to install.wim option)
3) MultiArchitecture: (I use abbodi's multiarchitecture script to combine x64 and x86 images. So in this step everthing is combined) Note: You have to use W10's or W11's x64 ISO as a base and extract others to it. Or It won't work.
4) Boot.wim (If you used W11 as a base, then you will need to apply TPM ByPass) (Or add your drivers etc in this step)
5) ISO Folder Remove answer file if its in iso root. We already have one unique answer file for each edition inside their panther folder. Also make your other edits. Autorun files icons etc. Also you can open boot.wim or install.wim with 7Zip and remove/add files now too. Its handy to make changes that requires privilages because u can bypass that restriction with 7zip.
6) Convert to esd and create an ISO.

Required scripts;
Multilang Scripts: w11/10 - w8.1/8 - w7
MultiArchitecture Script: Here

Also I attached my example preset that I use for w11 and w10. I use similar for w8.1 and w7 (same unattend part) You can see that i don't change much in unattend part. I use abbodi's scripts because with his multilang script you can get a nice GUI selection at the start of setup to choose what language you want. When you add language files manually via ntlite by yourself you won't get that GUI. I use multiarchitecture script because when I did it manually by myself via ntlite in the past, i always had issues like yours. So i found his scripts that handles everything properly combines ISOs and editions. BTW I create multi lang and ntlite in order and before multilang because if you combine them first you will endup with a 30gb iso that you have to mount and unmount lots of time for each edit. So start doing edits on seperate isos then combine them. its faster and safer and easier to start again on just one small ISO than starting again on 30gb iso.
Hi crypticus

Thanks for putting this together, really appreciate it. I've only had chance to glance through it and won't be able to try it out until later today. I've been using W10 32bit as the base as understood that could cope with x86 & x64 whereas the 64 could only do x64

Once I've worked through it I will post back how I got on

Cheers
 
i got an update regarding the black screen bit.

i created an iso, ran the vm and it installed. once tested, i deleted that iso.
i created another iso with the same name, and ran the vm without mounting that image. i DID manage to replicate exactly the same issue with the black screen image.

that could also explain the blue screen one too. so we can write that one down to the VM
It's possible but I've also been testing numeruos different ISO's with different names, so am still pretty confident it's not the VM

crypticus sent a good write up that I'll be working though, so will see how I get on with that

Cheers
 
Hi crypticus

Thanks for putting this together, really appreciate it. I've only had chance to glance through it and won't be able to try it out until later today. I've been using W10 32bit as the base as understood that could cope with x86 & x64 whereas the 64 could only do x64

Once I've worked through it I will post back how I got on

Cheers
Well, it will be longerthan I thought before I can work through this, life changing scenario just came in - start a new job in the morning. Fortunaley I have a lot of my old school sysprep images as backup so can still work on machines

Once I get going through your setup though it should be way easier

Started to work my way through your post. For simplicity I'm not doing any languages as yet.

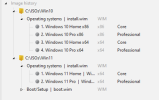
I worked thorugh and created a Win Home/Pro 10 32/64bit ISO and a Win 11 Home/Pro 64bit iso

Created a fresh simple preset, multi arhcitechture and applied it to each edition I wanted and removed the rest

2.png

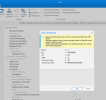
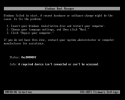
Then created an ISO for each. When booting I got the error screen below on my VM. So I attached the original ESD's that I downloaded from the links and got the same message. Can't do any more until after work, but wondered if you had seen anything similar?

1.png
 
Back
Top