You are using an out of date browser. It may not display this or other websites correctly.
You should upgrade or use an alternative browser.
You should upgrade or use an alternative browser.
Need help creating custom multiple edition ISO
- Thread starter Foden
- Start date
When I had no success booting the ISO’s created via NTLite I tried booting the ISO's that were created after downloading ESD from abbodi1406MDL and following the reference how to by Enthousiast. They give me the same error
I used the x32 base as I understood that would allow the ISO’s to boot in MBG or GPT and 32 or 64 bit
ESD's were form https://pastebin.com/raw/BCYtCKC3 & https://pastebin.com/raw/48epj6eS and are
Win 10 32
19044.1288.211006-0501.21h2_release_svc_refresh_CLIENTCONSUMER_RET_x64FRE_en-us.esd
Win 10 64
19044.1288.211006-0501.21h2_release_svc_refresh_CLIENTCONSUMER_RET_x86FRE_en-us.esd
Win 11
22000.318.211104-1236.co_release_svc_refresh_CLIENTCONSUMER_RET_x64FRE_en-us.esd
crypticus
Well-Known Member
1) Create x64 x86 folder inside multiarchitecture script's folder if they are not present.
2) Place your base iso's x64 and x86 to the correct folders (x64 and x86) in multiarch scripts's folder. base isos should be from w10 or w11....
3) Script will handle and combine everything. booting will be handled by script. don't worry about x86 or x64. DO NOT SWAP BOOT.WIMs, use only the one files created by script. STOP changing files.
Download your iso's from uupdump. thats the place we get ISO's from and those guides are prepared by using them.
if you are not following these or still facing issues I don't think I have other ways to help, because for me its the only way that works. Also I wouldn't be able to help more because sharing 3rd party tools or ways is not welcomed here. This forum is for ntlite and ntlite ways only. I break rules by showing you other scripts, and its only tolerated because they are from abbodi's and maybe I wrote them. So thats the best i can do.
Last edited:
HI, I REALLY appreciate you helping me out, and sorry that this is so frustrating for you. Something is off here with were I went follwing your instructions and I will back-track to see where I went wrong. I followed the MultiArchitecture Script: Here link you had posted , and that takes me to here1) Create x64 x86 folder inside multiarchitecture script's folder if they are not present.
2) Place your base iso's x64 and x86 to the correct folders (x64 and x86) in multiarch scripts's folder. base isos should be from w10 or w11....
3) Script will handle and combine everything. booting will be handled by script. don't worry about x86 or x64. DO NOT SWAP BOOT.WIMs, use only the one files created by script. STOP changing files.
Download your iso's from uupdump. thats the place we get ISO's from and those guides are prepared by using them.
if you are not following these or still facing issues I don't think I have other ways to help, because for me its the only way that works. Also I wouldn't be able to help more because sharing 3rd party tools or ways is not welcomed here. This forum is for ntlite and ntlite ways only. I break rules by showing you other scripts, and its only tolerated because they are from abbodi's and maybe I wrote them. So thats the best i can do.

I then followed the ESD>ISO Usage tutorial, and from there I was downloding the ESD's

and then followed the remainder of the tutorial
Thanks again
crypticus
Well-Known Member
NP I'm happy to help anyone, but i need to stay in NTLite forum rules, you dont need to use esd ISO tutorials, just use uupdump website to create your iso's https://uupdump.net
Thanks, appreciate your patience. I'm confused though as your link for MultiArchitecture Script: Here took me there and the thread is all about ESD. That's why I d/l'd the ESD's. I can't PM you and have'nt hit on the MultiArchitecture Script via google yet either and don;t want to cause any trouble for you here
Not to overstep anyone's work, I figured out (or re-invented) how to build this AIO using off-the-shelf parts.
We can do most of this entirely in NTLite, with two tiny scripts.
If you're using official ISO's, remove the other editions and leave only Home & Pro.
Keep the W10 & 11 versions in separate folders (don't mix & match).
Leave the universal lang AIO for another rainy day.
NTLite runs faster when you're working with smaller, separate WIMs.
Create a new unattend file using MBR layout (doesn't matter which image), and check the menu bar boxes:
Rename autounattend.xml -> autounattend_MBR.xml
Repeat for UEFI (or edit XML if you're knowledgeable) -> autounattend_UEFI.xml
Put as much or as little pre-selected settings as required (default lang choice?)
This article says MCT can create a dual-architecture, UEFI/MBR bootable ISO. Daniel B says why not reuse it instead of creating your own custom ISO. In the article, he links to a base folder you can download (20 MB). Or use MCT, and strip down the ISO yourself (yikes! 7 GB)
In the extracted multi-ISO folder, copy the ENTIRE saved W10 x86 ISO folder to x86 subfolder. Copy the ENTIRE W10 x64 ISO folder to x64 subfolder. When done, we'll have two side-by-side distros.
Remove \Setup.exe, x86\Setup.exe, x64\Setup.exe and any leftover file named \autounattend.xml.
Copy our autounattend_MBR.xml & autounattend_UEFI.xml to \
Load the x86 boot.wim, go inside and remove \Setup.exe
Rename \sources\setup.exe -> \sources\HIDE_setup.exe
Copy x86_startnet.cmd -> \Windows\System32\startnet.cmd
Apply changes to ISO.
Repeat with x64 boot.wim, and remove \Setup.exe
Rename \sources\setup.exe -> \sources\HIDE_setup.exe
Copy x64_startnet.cmd -> \Windows\System32\startnet.cmd
Apply changes to ISO.
Make sure there's no plain autounattend in either \ or inside both boot.wim's \
And no \Setup.exe inside both boot.wim's
Create the final ISO, using NTLite.


- Someone can improve the boot menu timeout to infinite instead of 30 sec. (bcdedit)
- There's a minor pause before Setup loads the select edition screen. The screen flashes with a blank CMD window -- meh.
- Someone could insert a diskpart /s [command file] to run "clean" to wipe partitioning, before calling Setup.
- Windows OOBE seems to want to immediately update some of my fresh installs. Insert the TargetReleaseVersionInfo reg hack to block this behavior.
I've included example autounattend files, for reference.
When you copy the arch-specific versions of startnet.cmd, rename them to startnet.cmd
The advantage of our setup, is we can replace install.wim and the autounattend files separately as drop-in replacements. It can be reused for other AIO projects. Could this be collapsed into one (instead of two) parallel distros? Anything's possible, but this requires zero coding knowledge to deploy. The magic is re-using the reference ISO from MCT's image.
Tested a few combinations (x86/64, MBR/UEFI). Maybe when I have time, I can spin this out into its own thread with more detailed walk-through.
My own contribution is really the scripted Setup /unattend hack.
Hope this benefits everyone.
We can do most of this entirely in NTLite, with two tiny scripts.
ISO's
Download the current builds from UUPdump, checked off only Home & Pro editions for simplicity.
EDIT - See new post below about which UUPdump image is right for multi-language.If you're using official ISO's, remove the other editions and leave only Home & Pro.
Language Packs
Download language packs for both W10 and 11 releases, in each architecture (handy script). Convert ESD to CAB.Keep the W10 & 11 versions in separate folders (don't mix & match).
Code:
    Microsoft-Windows-Client-LanguagePack-Package_uk-ua-amd64-uk-ua.cab
    Microsoft-Windows-Client-LanguagePack-Package_uk-ua-x86-uk-ua.cab
    Microsoft-Windows-LanguageFeatures-Basic-uk-ua-Package-amd64.cab
    Microsoft-Windows-LanguageFeatures-Basic-uk-ua-Package-x86.cab
Leave the universal lang AIO for another rainy day.
Integrate Updates
For each edition, load the matching lang files (for W10 or 11, & arch) into Updates, along with other updates. Integrate as normal.NTLite runs faster when you're working with smaller, separate WIMs.
Export WIMs
From the W11 image, Export All images and save them to W10 x64's sources\install.wim (Check No to Append, instead of overwriting). All four x64 images are in one WIM, both x86 images are in another WIM.Create Unattend Files
We're making two versions of autounattend.xml: one for MBR, one for UEFI. Both will be dual-architecture.Create a new unattend file using MBR layout (doesn't matter which image), and check the menu bar boxes:
- Copy to boot image
- Dual architecture
- Prompt edition selection
Rename autounattend.xml -> autounattend_MBR.xml
Repeat for UEFI (or edit XML if you're knowledgeable) -> autounattend_UEFI.xml
Put as much or as little pre-selected settings as required (default lang choice?)
Multi-Boot Environment
https://superuser.com/questions/948...-iso-with-both-pro-home-and-32-64-bit-flavorsThis article says MCT can create a dual-architecture, UEFI/MBR bootable ISO. Daniel B says why not reuse it instead of creating your own custom ISO. In the article, he links to a base folder you can download (20 MB). Or use MCT, and strip down the ISO yourself (yikes! 7 GB)
In the extracted multi-ISO folder, copy the ENTIRE saved W10 x86 ISO folder to x86 subfolder. Copy the ENTIRE W10 x64 ISO folder to x64 subfolder. When done, we'll have two side-by-side distros.
Code:
MultiIsoBase
+--> boot
+--> efi
+--> x86
|    +--> boot
|    +--> efi
|    +--> sources
|         +--> boot.wim
|         +--> install.wim
+--> x64
|    +--> boot
|    +--> efi
|    +--> sources
|         +--> boot.wim
|         +--> install.wim
Modify WinPE Setup
Using the trick highlighted by Windows deployment lab, Setup will pick which unattend file based on firmware type. Since W10 & 11 Setup are cross-compatible, we only need two files.Remove \Setup.exe, x86\Setup.exe, x64\Setup.exe and any leftover file named \autounattend.xml.
Copy our autounattend_MBR.xml & autounattend_UEFI.xml to \
Load the x86 boot.wim, go inside and remove \Setup.exe
Rename \sources\setup.exe -> \sources\HIDE_setup.exe
Copy x86_startnet.cmd -> \Windows\System32\startnet.cmd
Apply changes to ISO.
Repeat with x64 boot.wim, and remove \Setup.exe
Rename \sources\setup.exe -> \sources\HIDE_setup.exe
Copy x64_startnet.cmd -> \Windows\System32\startnet.cmd
Apply changes to ISO.
Make sure there's no plain autounattend in either \ or inside both boot.wim's \
And no \Setup.exe inside both boot.wim's
Create the final ISO, using NTLite.
Testing


- Someone can improve the boot menu timeout to infinite instead of 30 sec. (bcdedit)
- There's a minor pause before Setup loads the select edition screen. The screen flashes with a blank CMD window -- meh.
- Someone could insert a diskpart /s [command file] to run "clean" to wipe partitioning, before calling Setup.
- Windows OOBE seems to want to immediately update some of my fresh installs. Insert the TargetReleaseVersionInfo reg hack to block this behavior.
I've included example autounattend files, for reference.
When you copy the arch-specific versions of startnet.cmd, rename them to startnet.cmd
The advantage of our setup, is we can replace install.wim and the autounattend files separately as drop-in replacements. It can be reused for other AIO projects. Could this be collapsed into one (instead of two) parallel distros? Anything's possible, but this requires zero coding knowledge to deploy. The magic is re-using the reference ISO from MCT's image.
Tested a few combinations (x86/64, MBR/UEFI). Maybe when I have time, I can spin this out into its own thread with more detailed walk-through.
My own contribution is really the scripted Setup /unattend hack.
Hope this benefits everyone.
Attachments
Last edited:
Addendum
bcdedit /store "MultiIsoBase\boot\bcd" /set {bootmgr} timeout 11000000My manager forced me to write in VBS one year. Worst use of my company time.
VBS can silently execute commands with no screen pop-ups, go "borrow" a StackOverflow code snippet if you like.
diskpart /s commands.txt
^ I'd never do this on my personal system, but since these are donated PC's, data wipe is expected.
Just in case you come across a messed up system. Then run HIDE_setup /unattend.
Where UEFI is:
select 0
clean
gpt
Where MBR is:
select 0
clean
Pre-integrate in all W10 images (keeps the OOBE WU bogeyman away):
[HKEY_LOCAL_MACHINE\SOFTWARE\Policies\Microsoft\Windows\WindowsUpdate]
"ProductVersion"="Windows 10"
"TargetReleaseVersion"=dword:00000001
"TargetReleaseVersionInfo"="21H2"
Just realized a problem with UUPdump, by default the web page asks if you want to include (integrate) updates in the image. We can't check the box since language packs must be installed before updates. Otherwise you'll have to re-install updates.
NTLite correctly handles this ordering, but UUPdump's script has no provision to add other languages before firing off. When you don't check the updates box, UUPdump is essentially giving you the same as the RTM version. Might as well switch to them.
Feature update to Windows 10, version 21H2 (19044.1288) x86
Feature update to Windows 10, version 21H2 (19044.1288) amd64
Windows 11 Insider Preview 10.0.22000.1 (co_release) amd64 <-- yes, it says "Insider Preview" that's just how UUP labels it
Download the latest LCU's and .NET updates, plus the language CAB's, and integrate like in a normal setup.
crypticus
Well-Known Member
abbodi86 i think its his scripts maybe he can think about changing it if needed. or maybe multi lang or arch support into uupdumpJust realized a problem with UUPdump, by default the web page asks if you want to include (integrate) updates in the image. We can't check the box since language packs must be installed before updates. Otherwise you'll have to re-install updates.
NTLite correctly handles this ordering, but UUPdump's script has no provision to add other languages before firing off. When you don't check the updates box, UUPdump is essentially giving you the same as the RTM version. Might as well switch to them.
Feature update to Windows 10, version 21H2 (19044.1288) x86
Feature update to Windows 10, version 21H2 (19044.1288) amd64
Windows 11 Insider Preview 10.0.22000.1 (co_release) amd64 <-- yes, it says "Insider Preview" that's just how UUP labels it
Download the latest LCU's and .NET updates, plus the language CAB's, and integrate like in a normal setup.
Thanks for doing this, very much apprecited. I will work though it and do my best not to drive you nutz. Going to take a day or so to go through it due to work, commitments etc. so may not rpeort back right away - thanks again!!Not to overstep anyone's work, I figured out (or re-invented) how to build this AIO using off-the-shelf parts.
We can do most of this entirely in NTLite, with two tiny scripts.
ISO's
Download the current builds from UUPdump, checked off only Home & Pro editions for simplicity.
EDIT - See new post below about which UUPdump image is right for multi-language.
If you're using official ISO's, remove the other editions and leave only Home & Pro.
Language Packs
Download language packs for both W10 and 11 releases, in each architecture (handy script). Convert ESD to CAB.
Keep the W10 & 11 versions in separate folders (don't mix & match).
Code:Microsoft-Windows-Client-LanguagePack-Package_uk-ua-amd64-uk-ua.cab Microsoft-Windows-Client-LanguagePack-Package_uk-ua-x86-uk-ua.cab Microsoft-Windows-LanguageFeatures-Basic-uk-ua-Package-amd64.cab Microsoft-Windows-LanguageFeatures-Basic-uk-ua-Package-x86.cab
Leave the universal lang AIO for another rainy day.
Integrate Updates
For each edition, load the matching lang files (for W10 or 11, & arch) into Updates, along with other updates. Integrate as normal.
NTLite runs faster when you're working with smaller, separate WIMs.
Export WIMs
From the W11 image, Export All images and save them to W10 x64's sources\install.wim (Check No to Append, instead of overwriting). All four x64 images are in one WIM, both x86 images are in another WIM.
Create Unattend Files
We're making two versions of autounattend.xml: one for MBR, one for UEFI. Both will be dual-architecture.
Create a new unattend file using MBR layout (doesn't matter which image), and check the menu bar boxes:
- Copy to boot image- Dual architecture- Prompt edition selection
Rename autounattend.xml -> autounattend_MBR.xml
Repeat for UEFI (or edit XML if you're knowledgeable) -> autounattend_UEFI.xml
Put as much or as little pre-selected settings as required (default lang choice?)
Multi-Boot Environment
https://superuser.com/questions/948...-iso-with-both-pro-home-and-32-64-bit-flavors
This article says MCT can create a dual-architecture, UEFI/MBR bootable ISO. Daniel B says why not reuse it instead of creating your own custom ISO. In the article, he links to a base folder you can download (20 MB). Or use MCT, and strip down the ISO yourself (yikes! 7 GB)
In the extracted multi-ISO folder, copy the ENTIRE saved W10 x86 ISO folder to x86 subfolder. Copy the ENTIRE W10 x64 ISO folder to x64 subfolder. When done, we'll have two side-by-side distros.
Code:MultiIsoBase +--> boot +--> efi +--> x86 | +--> boot | +--> efi | +--> sources | +--> boot.wim | +--> install.wim +--> x64 | +--> boot | +--> efi | +--> sources | +--> boot.wim | +--> install.wimModify WinPE Setup
Using the trick highlighted by Windows deployment lab, Setup will pick which unattend file based on firmware type. Since W10 & 11 Setup are cross-compatible, we only need two files.
Remove \Setup.exe, x86\Setup.exe, x64\Setup.exe and any leftover file named \autounattend.xml.
Copy our autounattend_MBR.xml & autounattend_UEFI.xml to \
Load the x86 boot.wim, go inside and remove \Setup.exe
Rename \sources\setup.exe -> \sources\HIDE_setup.exe
Copy x86_startnet.cmd -> \Windows\System32\startnet.cmd
Apply changes to ISO.
Repeat with x64 boot.wim, and remove \Setup.exe
Rename \sources\setup.exe -> \sources\HIDE_setup.exe
Copy x64_startnet.cmd -> \Windows\System32\startnet.cmd
Apply changes to ISO.
Make sure there's no plain autounattend in either \ or inside both boot.wim's \
And no \Setup.exe inside both boot.wim's
Create the final ISO, using NTLite.
Testing
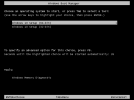
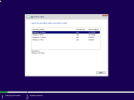
View attachment 7092
View attachment 7093
- Someone can improve the boot menu timeout to infinite instead of 30 sec. (bcdedit)
- There's a minor pause before Setup loads the select edition screen. The screen flashes with a blank CMD window -- meh.
- Someone could insert a diskpart /s [command file] to run "clean" to wipe partitioning, before calling Setup.
- Windows OOBE seems to want to immediately update some of my fresh installs. Insert the TargetReleaseVersionInfo reg hack to block this behavior.
I've included example autounattend files, for reference.
When you copy the arch-specific versions of startnet.cmd, rename them to startnet.cmd
The advantage of our setup, is we can replace install.wim and the autounattend files separately as drop-in replacements. It can be reused for other AIO projects. Could this be collapsed into one (instead of two) parallel distros? Anything's possible, but this requires zero coding knowledge to deploy. The magic is re-using the reference ISO from MCT's image.
Tested a few combinations (x86/64, MBR/UEFI). Maybe when I have time, I can spin this out into its own thread with more detailed walk-through.
My own contribution is really the scripted Setup /unattend hack.
Hope this benefits everyone.
Appreciate all the work both of you have put into this. I'm not too bothered with language packs for now, just need to get time to work through this properly and can then circle-back and make it nicerabbodi86 i think its his scripts maybe he can think about changing it if needed. or maybe multi lang or arch support into uupdump
Thanks again to you both!!!!!!
Working with Foden offline...
I've tested a new version where startnet's CMD window is hidden (invisible.vbs). It's very clean looking, but takes 10 seconds before moving to Setup. WinPE tools are very slow... To me, the old version gives a better idea the program was busy.
Added diskpart commands to wipe partitioning before Setup runs. This allows us to switch legacy to UEFI and not worry that Setup can't do the "convert GPT" on existing system disks. It's a trivial step that MS hasn't fixed...
Code:
wpeinit
powercfg /s 8c5e7fda-e8bf-4a96-9a85-a6e23a8c635c

set ARCH=x64
for %%A in (D E F G H I J K L M N O P Q R S T U V W X Y Z) do if exist %%A:\%ARCH%\sources set DRIVE=%%A

wpeutil UpdateBootInfo
for /f "tokens=2* delims=        " %%A in ('reg query HKLM\System\CurrentControlSet\Control /v PEFIRMWAREType') do set FIRMWARE=%%B

if %FIRMWARE%==0x1 (
        diskpart /s %DRIVE%:\clean-MBR.txt
        %DRIVE%:\%ARCH%\sources\HIDE_setup.exe /unattend:%DRIVE%:\autounattend_MBR.xml
) else (
        diskpart /s %DRIVE%:\clean-UEFI.txt
        %DRIVE%:\%ARCH%\sources\HIDE_setup.exe /unattend:%DRIVE%:\autounattend_UEFI.xml
)